When Tim Berners-Lee invented the World Wide Web in 1989, there was no JavaScript, no CSS, only HTML.
Although HTML has changed greatly over 35 years, expanding from its original 18 tags to well over 120, it retains its central importance: it is the foundational technology for the web.
If your site is based on good HTML, it will load fast. Browsers incrementally render HTML – that is, they will display a partially downloaded web page to the user while the browser awaits the remaining files from the server.
Modern fashionable development techniques, such as React, require a lot of JavaScript to be sent to the user. When it’s all downloaded, the user’s device must parse and execute the JavaScript before it can even start to construct the page. On a slow network, or on a cheaper, low-powered device, this can result in an excruciatingly slow load and is a heavy drain on the battery.
Sites based on good HTML will also be robust – even if the styles and scripts fail to load, the content will be available. HTML is simultaneously backward compatible and future-proof.
- Future-Proof HTML
- No-One Writes HTML by Hand Anymore, Grandad!
- The Structure of an HTML Element
- Choosing the Right HTML Element
- Marking-Up a Common Web Page
- Common HTML Tags Reference
- What If There Is No Appropriate HTML Element?
- Microdata
- Forms
- Deprecated Elements
- Frequently Asked Questions
- Conclusion
Ready? Let’s go.
Future-Proof HTML
To demonstrate the future-proof nature of HTML, you can open the first-ever web browser, which was written by Sir Uncle Timbo himself in 1991. Open a web page by choosing Document > Open from Full Document Reference, and type a URL in the box.
A well-structured HTML document will still render. It won’t have any styles (CSS 1 wasn’t specified until 1996, and it was 2000 until IE5 for Mac shipped with an almost full implementation) and some of the more exotic punctuation marks or characters might be replaced by their character codes, but you can still read the content. And, for the vast majority of sites, the content is what users come for.
For example, here is the Web Accessibility Checklist review on this very site rendered in the 1991 browser:
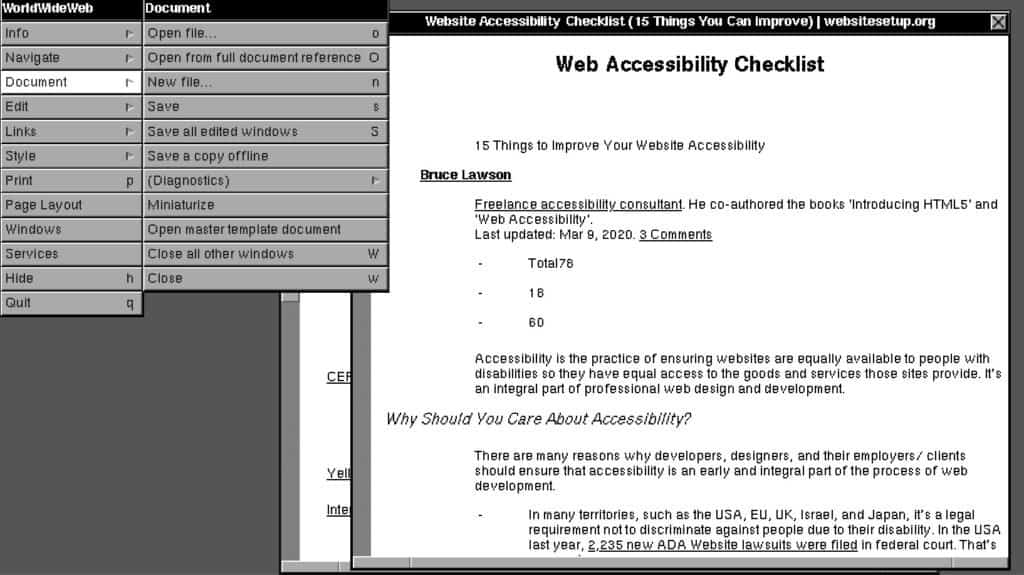 Article on Web Accessibility on this site in the 1991 WorldWideWeb browser
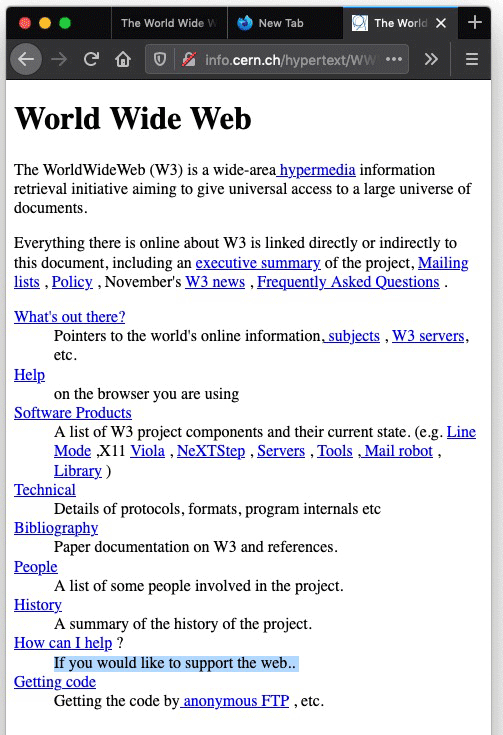
To demonstrate HTML’s future-proof nature, let’s look at the first-ever web page in a modern browser:
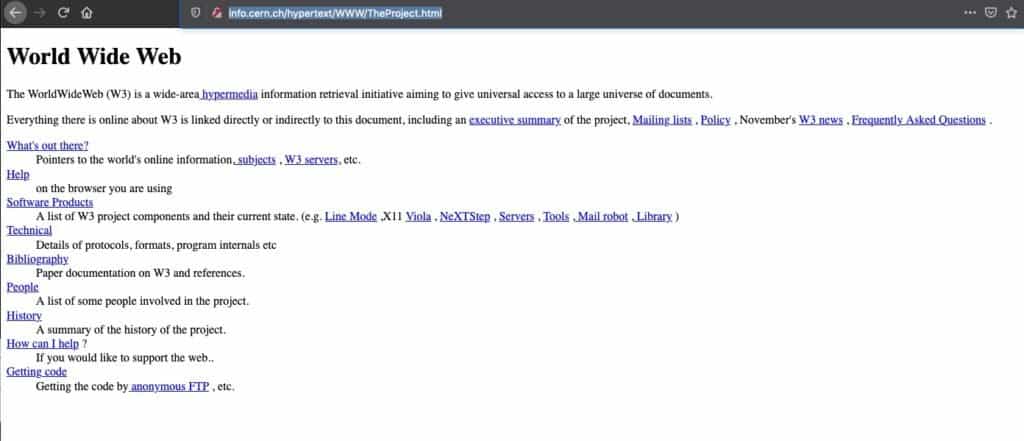
As you can see, it renders perfectly – and is completely responsive when narrowing the window:
No-One Writes HTML by Hand Anymore, Grandad!
It’s become fashionable to declare HTML a redundant skill. With WordPress powering around 43% of the web in 2026, it’s true that the average person can build a fully functional website without ever opening a text editor. Joomla and Drupal work similarly, and even professional developers increasingly assemble sites from pre-written components rather than writing markup from scratch.
But someone still has to write those templates and components – and anyone using them needs enough HTML knowledge to tell the good ones from the bad. Picking a WordPress theme or a React component without understanding HTML is like choosing a restaurant without being able to read a menu.
Think of it like eating out at a buffet. You’ll eat far better if you can tell which dishes were made fresh by a skilled chef and which were microwaved from frozen – even if you never plan to cook yourself.
The Structure of an HTML Element
Before we begin looking at what constitutes good HTML, let’s take a look at the structure of an HTML element. (If you already know this, feel free to skip this section.)
Here’s an HTML tag that tells the browser “this is a paragraph”:
<p>
Browsers don’t care much about upper or lower case in HTML: <video>, <VIDEO>, <Video> and even <vIdEo> are all the same. But conventionally we use lower case because capitals look like shouting. This one is an opening tag. Most – but not all – tags have a corresponding closing tag.
As with the opening tag, the closing tag is enclosed in angle brackets, but here the tag name is preceded by a forward slash, which tells the browser that this is a closing tag:
</p>
As you can see, the tag name is surrounded by angle brackets. The opening tag, the content between the opening and closing tags, and the closing tag together form an HTML element. Here, we have two paragraph elements:
<p>I'm a paragraph!</p>

<p>And so am I!</p>
By default, a web browser will display these with a blank line between the paragraphs. But this is only the default; the display can be changed using a separate language called Cascading Style Sheets (CSS) without changing the HTML in any way.
Tags can also have attributes that give the browser extra information about the tag. Some attributes are allowed on all tags, others are allowed only on a subset. Attributes have names and assigned values in the opening tag.
This tells the browser that this particular paragraph is in the English language:
<p lang="en">
Some attributes appear not to take a value. For example <audio loop> is a shorthand for <audio loop=”loop”>; either format is legitimate. Be careful with Boolean attributes; as the spec says,
A number of attributes are boolean attributes. The presence of a boolean attribute on an element represents the true value, and the absence of the attribute represents the false value… To represent a false value, the attribute has to be omitted altogether.
Tags can have multiple attributes:
<p lang="en" class="warning">
This tells the browser that this particular paragraph is in the English language, and it belongs to the class called “warning” (which we may, for example, color red to make it stand out from the surrounding paragraphs).
Some attributes can take multiple values, which are separated by spaces:
<p class="discount seasonal">
This paragraph is a member of the “discount” class (perhaps we want to style this to draw attention to it) and also is a member of the “seasonal” class (perhaps we want to show a picture of a Christmas tree next to it).
And that is all you need to know about the structure of an HTML tag.
Choosing the Right HTML Element
Sometimes I like to think HTML is like the English language. It’s pretty easy to read, but much harder to write -there are so many quirks and irregularities.
Although HTML has such a small vocabulary (the average 2.5-year-old toddler speaks more words in their native language than are elements in HTML), many people’s HTML is imprecise. Vague HTML can make content harder to parse for search engines, assistive technologies such as screen readers for blind visitors, and non-traditional devices such as Apple Watch and voice assistants.
When I talk about “good” HTML, I really mean “semantic” HTML: tags that describe the content as precisely as possible. You need to ask the philosophical question: what is this content? And which tag best describes what it is, not what it looks like. Clear your mind of any thoughts of colors, spacing, borders, or typography; those are not what the content is, just its appearance, and are defined by CSS.
Sometimes, it’s very easy to describe what some content is. For example, consider this list of the top three best songs by The Cheeky Girls:
- Cheeky Song (Touch My Bum)
- (Hooray, Hooray!) It’s a Cheeky Holiday!
- Take Your Shoes Off
It’s easy to see that this is a list and the order of the entries matters. The song “Touch My Bum” is objectively better than “Cheeky Holiday” (and quite possibly the best song ever). That’s why they’re numbered.
We would use the HTML <ol> (ordered list) tag to surround this whole list, and each entry will be enclosed in an <li> (list item):
<ol>

<li>Cheeky Song (Touch My Bum)</li>

<li>(Hooray, Hooray!) It's a Cheeky Holiday!</li>

<li>Take Your Shoes Off</li>

</ol>
Do you want a chart show style countdown to the number one? Simply use the reversed attribute on the <ol>:
<ol reversed>

 	<li>Take Your Shoes Off</li>

 	<li>(Hooray, Hooray!) It's a Cheeky Holiday!</li>

 	<li>Cheeky Song (Touch My Bum)</li>

</ol>
Assuming you’re in a modern browser, you’ll see the list counting down:
- Take Your Shoes Off
- (Hooray, Hooray!) It’s a Cheeky Holiday!
- Cheeky Song (Touch My Bum)
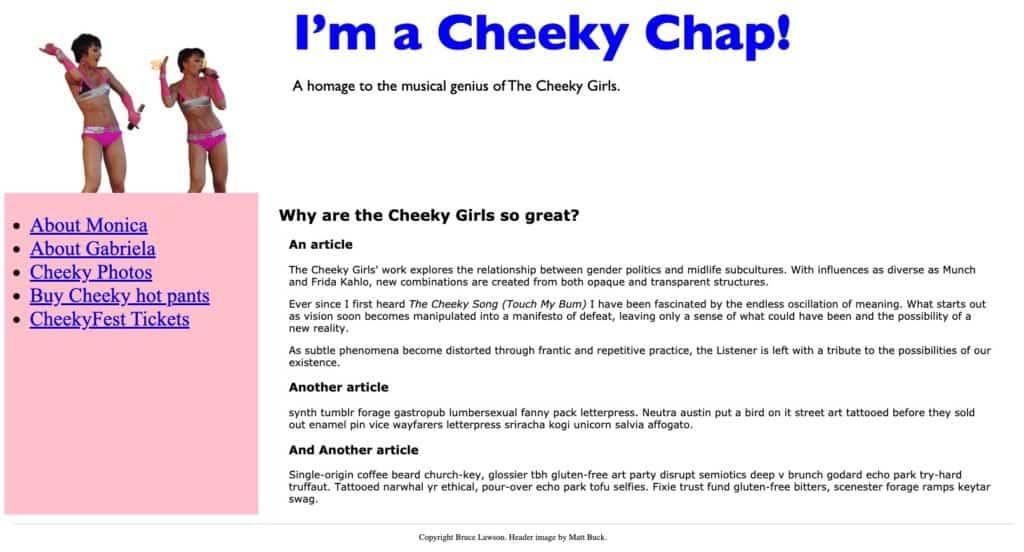
Sometimes it’s not immediately obvious which tag to use. Consider this horizontal navigation menu on my Cheeky Girls fan site:
![]()
Of course, each of the menu items is a link, but what else? It’s another list – a list of pages on my site. But with this list, the order doesn’t matter; Gabriela could be first and Monica second.
For an unordered list, we use <ul>, with each entry an <li>, like this:
<ul>

<li><a href="monica.html">About Monica</a></li>

<li><a href="gabriela.html">About Gabriela</a></li>

…

</ul>
The benefit of using a list here is that assistive technology, that some disabled people need to use, knows what to do with them. A screen reader, for example, will say something like “List of five items”, and usually gives the user the opportunity to skip over the list, or skip to the next list.
On the subject of assistive technology, let’s give some extra information to screen reader users, and wrap our <ul> in a <nav> element, like this:
<nav>

<ul>

<li><a href="monica.html">About Monica</a></li>

<li><a href="gabriela.html">About Gabriela</a></li>

…

</ul>

</nav>
As you might imagine, <nav> tells the browser that this is primary navigation. A screen reader user will be told that they’re in the <nav> and they will probably have a keyboard shortcut to go straight to the <nav>, or to skip to the end of it.
Marking-Up a Common Web Page
Although this article is long, we don’t have space to go through all the elements of HTML. Mozilla Developer Network (MDN) has a useful set of tutorials and a superb reference site that is the go-to resource even for seasoned web pros who’ve forgotten the precise syntax of something.
So now, let’s make a real webpage, the kind you’ve seen hundreds of times before, whether it’s a video site, a newspaper site, a site selling products, or a humble blog. Ours is a small site that pays tribute to the musical genius of The Cheeky Girls.
You don’t need loads of expensive programs or a powerful computer to develop websites, just a code editor and a browser.
I use Microsoft’s free open-source code editor Visual Studio Code, but there are many others such as Sublime Text and Zed (a modern, fast editor). If you prefer something AI-assisted, Cursor is VS Code-based and adds code completion features.
So, let’s dive in and get coding.
Setting Up the Scaffolding
Before we can write our content, there is some scaffolding required. If your code editor supports saving snippets or templates, this would be a good one to use for every web page you make:
<!DOCTYPE html>

<html lang="en">

<head>

<meta charset="utf-8">

<meta name="viewport" content="width=device-width, initial-scale=1.0">

<title>Cheeky Chap: home</title>

</head>
- Line 1 is the equivalent of a magical incantation to tell the browser that the code coming up is the latest, greatest version of HTML.
- Line 2 tells the browser that the primary content of the webpage is in English. This is important for translation software and also for people who use a screen reader: the word “six” is pronounced very differently in English and French, for example. For most languages, the language tag is pretty easy to determine. The organization, W3C, that makes the standards that the Web relies on, has a guide to Choosing a Language Tag.
- Line 3 opens up the “head” of the web page – this is a block of information about the page that helps the browser process it properly.
- Line 4 tells the browser that we’re using a character encoding that can handle all the human languages and emojis that you could ever want. If you’ve ever seen a web page with weird characters like “£”, “�” or empty boxes in the middle of words, you know why we need this line.
- Line 5 is another magical incantation. It tells the browser to display the web page at the width of the device it’s being displayed on and helps sites reformat across wide desktop displays and narrow mobile screens.
- Line 6 is the only one you should change. The <title> of the page is the text that is first read out to a screen reader user, to assure them they’re on the right page. It also determines the sort order in browser bookmarks so I use a system that has site name first (so all bookmarks into the site are grouped together) and then the page title afterward. For example <title>Cheeky Chap – Home</title>, <title>Cheeky Chap – About Monica</title>. There’s no one true way to write your <title>; the golden rule is to be consistent across all the pages in your site.
Adding Our Content
Now it’s time for us to add the code specific to our site. HTML is a markup language, so we often call the process of turning textual content into HTML as “marking it up”.
The Body
Now we’ve closed the <head>, let’s open the <body>. (Strictly speaking, the <head></head> and <body></body> tags aren’t necessary, but as you will see them on other people’s sites, it’s important that you know what they do).
Type <body> into your code editor. Depending on your editor and its settings, it might automatically generate a closing </body> tag for you. If so, put some blank lines between the opening and closing tag to make sure you don’t accidentally enter code after the closing </body> tag, as that won’t be displayed and will be annoying.
Remember when I said that when you write your HTML you should pay no attention to how the page will look?
There’s one exception to the rule: think about what order the content is in. By default, the browser will show all content in source order (you can change this, but it’s more work). So we’ll look at the content that comes first and write that HTML first.
The Header
The first discrete piece of content on our page is the banner at the top. This will be at the top of every page on our site.

The HTML for the whole banner will be wrapped in <header> </header> tags. As the HTML specification says “The header element represents a group of introductory or navigational aids”.
Inside it, we have an image of the cheeky girls that also serves as a link to the homepage, the main heading for the page (“I’m a Cheeky Chap!”), and some supplementary text.
Let’s look at the image that’s a home page link.
Clickable links (somewhat confusingly) don’t use the <link> tag; they use the <a> tag, which stands for “anchor”. This tag has an attribute, href, that defines the destination of the link. A normal text link is structured like this:
<a href="index.html">Home page</a>
The text “Home page” will appear on the screen, probably underlined in blue, and if you click on this, the browser will clear the screen and load up index.html.
However, our link doesn’t have any text, it’s purely a clickable image. The simplest way to put an image on the web is to use the <img> tag.
It’s structured like this:
<img src="dog.jpg" alt="a nice dog">
The attribute src points to a file that will be pulled into the webpage at this point. The second attribute, alt, is for “alternate text”. This is for those who can’t see the image, due to visual impairment or because they’ve turned off images in their browser to make accessing the content faster and cheaper.
You don’t need to write “picture of ..” or “image of…”; a screen reader will automatically prepend that. Every <img> must have an alt attribute. In older sites, you might see blank alt text (alt=””). This indicates that the image conveys no information and has no function – it’s purely decorative.
In modern sites, decorative images are applied using CSS and are not in HTML, as they are purely about presentation and not content. WebAIM has a useful quiz-format introduction to writing good alternate text.
Notice that <img> doesn’t have a closing tag. In some older websites, you might see it written <img src=”dog.jpg” alt=”a nice dog” /> which is called “self-closing”. Either one is okay.
To make a clickable image that is a link to your home page, we need to nest one tag inside the other. There’s one change we need to make – if the image is a link, the alt text needs to describe the destination of the link (“Home”) rather than the content of the image.
<a href="index.html"><img src="cheeky-girls.jpg" alt="Home"></a>
The next part of our header is the name of the site – “I’m a Cheeky Chap”. As this is the heading for the entire page, we’ll give it the most important level of heading, <h1>I’m a cheeky chap</h1>.
HTML has 6 levels of heading, inventively named <h1>, <h2> etc. There should only be one <h1> on any particular page, and sub-headings should not ‘skip’ a level. The hierarchy of headings is very important for assistive technology users to navigate a page. If your page has sensible heading hierarchy, you can use it to automatically generate a table of contents so visitors can navigate around long texts.
Nearly all assistive technology has a shortcut for ‘go to the next heading’; in the commercial screen reader JAWS and the free screen reader NVDA, the H key means ‘go to the next header’, pressing ‘2’ jumps to the next <h2> (amongst many other single-key navigation shortcuts).
Now all that’s left to do is mark up the text “A homage to the musical genius of The Cheeky Girls”. It’s not really a heading, it’s more like a strapline (“a short, easily remembered phrase used by an organization so that people will recognize it or its products”).
Since HTML doesn’t have a dedicated strapline tag, we’ll wrap it in a <p> element, which gives us our full header:
<header>

<a href="index.html"><img src="cheeky-girls.jpg" alt="Home"></a>

<h1>I'm a Cheeky Chap!</h1>

<p>A homage to the musical genius of The Cheeky Girls</p>

</header>
Next on the page comes the navigation. We already know how to construct this:
<nav>

<ul>

<li><a href="monica.html">About Monica</a></li>

<li><a href="gabriela.html">About Gabriela</a></li>

....

</ul>

</nav>
The Main Content
Now it’s time to turn our attention to the main content – the actual meat of the page.
HTML has a special element for this, <main>, which will wrap all the content in the screenshot above. The heading for the series of three posts is “Why are the Cheeky Girls so great”, so we’ll give that a heading tag. We’ve already used an <h1> in the header, and there should only be one per page, so we’ll wrap this one in an <h2>.
Next, we have three posts, each self-contained, and with its own heading.
For each of these, we’ll use an <article> element. Don’t fall into the trap of thinking that <article> is only for news articles or blog posts; think of it like an article of clothing. You can wear a different shirt with the trousers you’re wearing; your trousers are one article of clothing, your shirt is another.
A page full of videos could wrap each video and synopsis in <article>; a page that is a product listing could wrap each product in <article>. Using an <article> element has the extra advantage of helping Apple Watch layout content in a visually appealing way.
We will give each article’s heading a heading tag. The next one in sequence is <h3> as we’ve used <h2> as the heading for the main content. We will give each heading a <h3> tag because they’re all on the same level in the hierarchy.
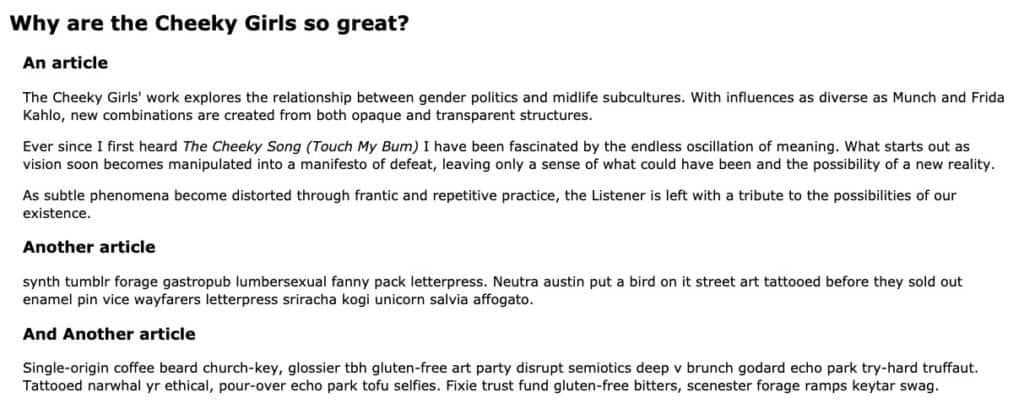
<main>

<h2>Why are the Cheeky Girls so great</h2>

<article>

<h3>An article</h3>

<p>The Cheeky Girls' work .. </p>

<p>Ever since …</p>

<p>As subtle phenomena …</p>

</article>


<article>

<h3>Another article</h3>

…

</article>


<article>

<h3>And another article</h3>

…

</article>

</main>
The Footer
There’s now just one piece of content left to mark up: the footer.
Unsurprisingly, and pleasingly intuitively, HTML gives us the <footer> element for this. But what of the content inside it (which reads “Copyright Bruce Lawson. Header image by Matt Buck.”)?
The specification tells us of the <small> element:
The small element represents side comments such as small print.
Small print typically features disclaimers, caveats, legal restrictions, or copyrights. Small print is also sometimes used for attribution, or for satisfying licensing requirements.
Copyright and attribution is exactly the purpose of this content, so we’ll mark up our footer like this:
<footer>

<small>Copyright Bruce Lawson. Header image by Matt Buck.</small>

</footer>
The Complete Page
Here’s the fully assembled HTML for our Cheeky Girls tribute page. If you’ve been following along in your code editor, yours should look similar:
<!DOCTYPE html>
<html lang="en">
<head>
<meta charset="utf-8">
<meta name="viewport" content="width=device-width, initial-scale=1.0">
<title>Cheeky Chap: home</title>
</head>
<body>
<header>
<a href="index.html"><img src="cheeky-girls.jpg" alt="Home"></a>
<h1>I'm a Cheeky Chap!</h1>
<p>A homage to the musical genius of The Cheeky Girls</p>
</header>

<nav>
<ul>
<li><a href="monica.html">About Monica</a></li>
<li><a href="gabriela.html">About Gabriela</a></li>
<li><a href="discography.html">Discography</a></li>
<li><a href="gallery.html">Gallery</a></li>
<li><a href="contact.html">Contact</a></li>
</ul>
</nav>

<main>
<h2>Why are the Cheeky Girls so great</h2>
<article>
<h3>An article</h3>
<p>The Cheeky Girls' work ...</p>
</article>

<article>
<h3>Another article</h3>
<p>Ever since ...</p>
</article>

<article>
<h3>And another article</h3>
<p>As subtle phenomena ...</p>
</article>
</main>

<footer>
<small>Copyright Bruce Lawson. Header image by Matt Buck.</small>
</footer>
</body>
</html>
Save this as index.html, open it in your browser, and you’ll have a fully functional (if unstyled) webpage. Not bad for a few lines of code.
Quality Assurance
And now that we’ve finished, let’s run a check on the quality of our code.
The W3C has a free HTML validator which can either validate a page on the web, accept a file upload, or let you copy and paste your code into a form. You should always check your code before applying styles, writing a script, or publishing it to the web.

If you also check the “outline” checkbox before clicking the “check” button, the validator will show you any errors and the heading hierarchy and logical structure of your page.
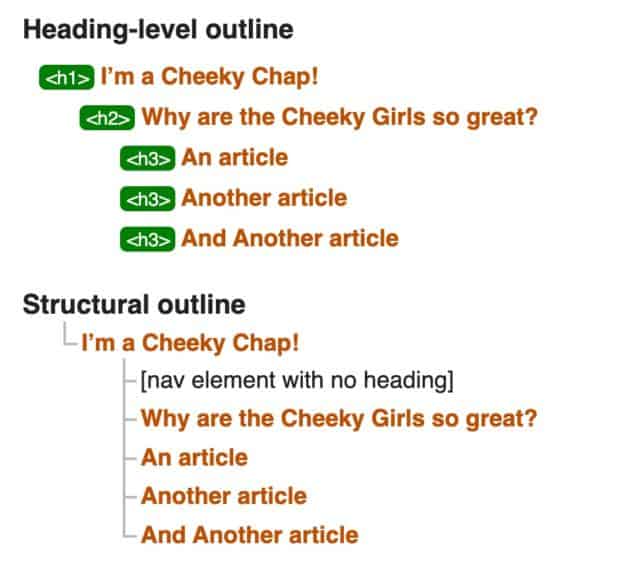
Don’t worry about the warning “[nav element with no heading]”; sighted users will understand that it’s navigation and assistive technology users will be informed automatically.
Common HTML Tags Reference
We’ve spent a lot of time on the philosophy of choosing the right element. Now let’s look at the most common HTML tags you’ll reach for on a daily basis. Think of this as a quick-reference card you can come back to.
Text Formatting Tags
These tags let you add meaning (and visual emphasis) to inline text. Remember: choose the tag that describes the meaning of the content, not the look you want.
<strong>Important text</strong>
<em>Emphasized text</em>
<mark>Highlighted text</mark>
<small>Fine print or side comment</small>
<del>Text that has been removed</del>
<ins>Text that has been inserted</ins>
<sub>Subscript (like H<sub>2</sub>O)</sub>
<sup>Superscript (like x<sup>2</sup>)</sup>
A common source of confusion: <strong> vs <b>, and <em> vs <i>. The short version:
- <strong> means “this text is important” – browsers display it as bold, and screen readers may emphasize it vocally.
- <b> means “visually offset this text” without adding extra importance. Use it for things like product names or key words in a summary where you want bold but aren’t conveying urgency.
- <em> means “this text is stressed” – it changes the meaning of a sentence. (“I love the Cheeky Girls” vs “I love the Cheeky Girls“).
- <i> means “this text is in an alternate voice” – use it for technical terms, foreign words, or ship names.
In practice, <strong> and <em> are almost always what you want.
Links and Images
We covered these in depth when building our Cheeky Girls page, but here’s the quick-reference:
<!-- A text link -->
<a href="https://example.com">Visit Example</a>

<!-- A link that opens in a new tab -->
<a href="https://example.com" target="_blank" rel="noopener">Visit Example</a>

<!-- An image -->
<img src="photo.jpg" alt="Description of the image" width="600" height="400">

<!-- An image with a caption -->
<figure>
  <img src="photo.jpg" alt="Description of the image" width="600" height="400">
  <figcaption>Photo credit: A. Photographer</figcaption>
</figure>
Notice the <figure> and <figcaption> elements – these are the semantic way to associate a caption with an image (or video, or code snippet, or diagram). They’re much better than just putting a paragraph of italic text below an image.
When linking to external sites, always add rel=”noopener” to links with target=”_blank”. This is a security best practice that prevents the linked page from gaining access to your page’s window object.
HTML Tables
Tables are for displaying tabular data – things like schedules, comparison charts, or the Cheeky Girls discography. Never use tables to control page layout (that’s CSS’s job).
Here’s a simple table:
<table>
  <thead>
    <tr>
      <th>Year</th>
      <th>Song</th>
      <th>UK Chart Position</th>
    </tr>
  </thead>
  <tbody>
    <tr>
      <td>2002</td>
      <td>Cheeky Song (Touch My Bum)</td>
      <td>2</td>
    </tr>
    <tr>
      <td>2003</td>
      <td>(Hooray, Hooray!) It's a Cheeky Holiday!</td>
      <td>3</td>
    </tr>
    <tr>
      <td>2003</td>
      <td>Take Your Shoes Off</td>
      <td>3</td>
    </tr>
  </tbody>
</table>
Key table elements:
- <table> – wraps the entire table.
- <thead> – groups the header row(s). Helps screen readers and allows the browser to repeat headers when printing long tables.
- <tbody> – groups the main data rows.
- <tr> – a table row.
- <th> – a header cell. Browsers display it bold and centered by default, and screen readers announce it as a heading for its column or row.
- <td> – a data cell.
You can also use <tfoot> for footer rows (totals, summaries) and <caption> to give the entire table a title that’s programmatically associated with it.
Blockquotes and Inline Quotes
For quoting someone at length, use <blockquote>:
<blockquote cite="https://example.com/source">
  <p>Touch my bum, this is life.</p>
</blockquote>
For a short quote inline with your text, use <q>:
<p>As Monica once said, <q>We are the Cheeky Girls</q>, and who could argue?</p>
The browser will automatically add the appropriate quotation marks for the document’s language.
What If There Is No Appropriate HTML Element?
Occasionally, you’ll find that there is no appropriate HTML element for your content.
Suppose, for example, in the middle of a paragraph, we want to tell assistive technology and translation software that a snippet of content is in the French language. In such cases, there is a generic tag called <span>:
<p>When I first heard The Cheeky Girls, I thought <span lang="fr">ouh là là!</span> and bought some pink hotpants.</p>
For wrapping larger components, there is another generic tag called <div>, short for “division”.
Imagine that you want to group your navigation and an ad together so you can style it as a sidebar on the left of your content. There is no <sidebar> element because HTML is concerned with the meaning of content, not its display. Our ad will go in an <aside> element, which the spec defines as “represents a section of a page that consists of content that is tangentially related to the content around the aside element, and which could be considered separate from that content”.
Our navigation will go inside <nav>, as you know. And we will group them thus:
<div>

<aside>...</aside>

<nav> … </nav>

</div>
One of the biggest barriers to access on the web is over-use of <div> instead of a precise HTML element. As the spec says:
The div element has no special meaning at all … Authors are strongly encouraged to view the div element as an element of last resort, for when no other element is suitable. Use of more appropriate elements instead of the div element leads to better accessibility for readers and easier maintainability for authors.
Microdata
HTML gives us a mechanism to add ‘structured data’ attributes to our markup to make its meaning clear to machines.
This is, perhaps, most usefully combined with vocabularies for different kinds of content written by Schema, co-founded by Google, Microsoft, Yahoo, and Yandex.
Search engines aren’t the only consumers of microdata. Apple uses it to decide how to display information on the Apple Watch. Browser extensions can also make use of it.
In a blog post with some eye-watering numbers showing how various organizations increased their search traffic with structured data, Google said:
When you add markup to your content, you help search engines understand the different components of a page.
Schema has a huge list of different types of vocabularies from Geospatial Geometry to Hindu meals through Airlines and COVID testing facilities. But let’s look at the schema for a blog post.
Each article is marked up like this:
<article itemscope itemtype="https://schema.org/BlogPosting">

<h2 itemprop="headline">The birth of the Cheeky Girls</h2>

<time itemprop="dateCreated pubdate datePublished"

datetime="1982-10-31">31 October 1982</time>

<p>....</p>

<p>....</p>

</article>
Here, the itemscope attribute tells the search engine that the extent of this blog post is contained within this <article> element. The different itemprops are specified in the particular schema vocabulary, except the pubdate value on itemprop which isn’t from Schema but is required by Apple for WatchOS.
You’ll notice that I’ve used a <time> element in this example. The datetime attribute specifies a date (and potentially a time) in the unambiguous YYYY-MM-DD format, while the visible textual contents of the element can be anything: “The Cheeky Girls’ birthday”, “Tuesday”, “31 Oct 82”, “The Feast of Saint Karen and the Immaculate Surfboard”.
Forms
Forms are what make the web interactive and not just a read-only medium. No one enjoys filling in forms, and even fewer people enjoy coding them. The golden rule for forms is that every input field must have a corresponding label.
Here’s a demo I made of an unlabelled form field vs a labeled form field. They look identical, but the top one doesn’t have a proper label, whereas the second one does. Click into the text label of the bottom one, and you’ll see that it focuses on the associated input.

This makes focusing an input much easier for someone with motor control difficulties – or maybe for you, trying to check a tiny checkbox on a small screen on a bumpy train.
It’s also vital for screen reader users who will tab through fields in a form (by default, only links and form fields are focusable by tabbing). When they tab into an input field, the screen reader will announce the contents of the associated label, the type of field, and any other information such as whether it’s a required field.
The code for this is simple. The input field is given a unique ID, and the label is associated with it using the for attribute:
<label for="food">What's your favourite food?</label>

<input id="food">
Putting this together, a simple one-field form would look like this:
<form action="/form-handling-page.html" method="post">

<p>

<label for="food">What's your favourite food?</label>

<input id="food" name="food">

</p>

<button type="submit">Send</button>

</form>
The action attribute of the form is the URL of the page that will receive the form, do any work required, and probably say something like “thanks! Your info was received”. The method attribute tells the browser how to send this information to the server.
The name attribute on the <input> allows the server to access the information submitted in each field, and should, therefore, be unique in that form – except in the case of radio buttons, in which all mutually exclusive options share the same name (that’s how the browser knows they’re a group).
Hiding Labels
Occasionally, you might not want a visible label. Here’s an example when a label saying “Search” preceding the input feels like overkill.

We can associate the input field with the text “Search”, which is the contents of the submit button using aria-labelledby:
<input type="text" aria-labelledby="searchbutton">

<button id="searchbutton" type="submit">Search</button>
We could have used aria-label:
<input type="text" aria-label="Search">
But it’s always better to prefer visible text on a page because that will be translated if the page is run through a translation tool, whereas text “hidden” in HTML attributes won’t be.
Grouping Form Fields
<fieldset> groups a cluster of related fields. For example, the three-date of birth field pattern, or any cluster of radio buttons or related checkboxes.
<legend> as the first child of <fieldset> provides an over-arching label for the whole group, which gives them context. Then the individual fields plus their labels let you know what choices/options, etc. are available. Optionally, <legend> may contain a heading <h2> – <h6> element.
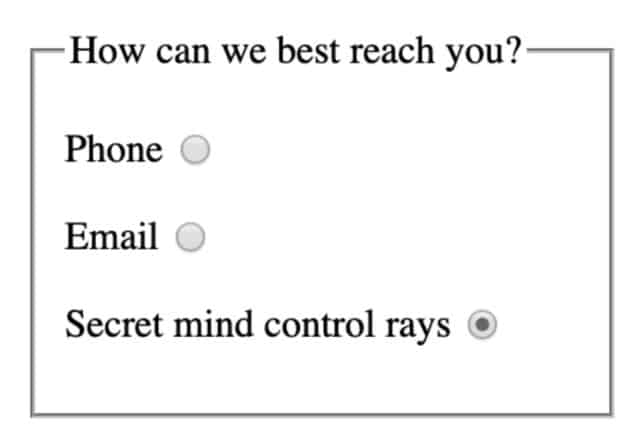
This markup groups radio buttons that allow the visitor to express their preferred contact method:
<fieldset>

<legend>

How can we best reach you?

</legend>

<p>

<label for=r1>Phone</label>

<input id=r1 type=radio name=contact_pref>

</p>

<p>

<label for=r2>Email</label>

<input id=r2 type=radio name=contact_pref>

</p>

<p>

<label for=r3>Secret mind control rays</label>

<input id=r3 type=radio checked name=contact_pref>

</p>

</fieldset>
Chromium-based browsers display this with the grouping highlighted:
In-Browser Input Validation
As with any other HTML, the type of element you choose should reflect the type of content you expect the visitor to enter into the form field. If you want them to select one option out of a few choices, radio buttons will allow this. Or a <select> allows choosing from a longer list of options (country of residence, for example).
<input> can take many attributes. The required attribute is very useful; the browser will automatically alert the user if they attempt to submit a form with an empty required field. You can limit the number of characters the user can enter with minlength and maxlength and even require a certain format of the input.
For example:
<input pattern="[0-9][A-Z]{3}" name="part"

title="A part number is a digit followed by three uppercase letters.">
Input Types
Other mechanisms exist to make the browser perform validation of input by using the type attribute to tell the browser what sort of input is expected:
- <input type=tel> tells the browser that a telephone number is expected.
- <input type=email> expects a valid email address.
- <input type=number> will hint to the browser to reject non-numeric input. Note that type=number should only be used for quantities – telephone numbers, credit card numbers, passport numbers are numeric, but not quantities.
On mobile, most browsers will use the input type to adjust the virtual keyboard that is offered:
- type=email shows an alphanumeric keyboard with an “@” symbol and a dot, as those are in all email addresses.
- type=number will show only numerals and a decimal separator appropriate to the user’s region.
- type=date will display some sort of system date picker.
There are many types of input – too many to list here – but the underlying markup approach remains the same: think about what your content means, not how it will look.
Auto Filling Forms
Allowing browsers to auto-fill forms requires visitors to do less, so they’re more likely to complete a form and sign up/buy your product. Autofill on Browsers: A Deep Dive is a great article by eBay about this.
Deprecated Elements
There are more HTML tags – the developer-focused specification lists them all.
It’s vital that you avoid using elements that are marked “deprecated” as these are outdated parts of HTML that still exist in the spec because they are used in some old (or badly-written) sites, but are now obsolete.
Some common deprecated elements you may encounter in old code:
- <center> – use CSS
text-align: centerinstead. - <font> – use CSS font properties instead.
- <marquee> – scrolling text. Just don’t.
- <frame> and <frameset> – use <iframe> if you genuinely need to embed another page.
If you see these in a tutorial or template, that’s a sign the code is very outdated and you should look for a better resource.
Frequently Asked Questions
What is HTML, exactly?
HTML stands for HyperText Markup Language. It’s the standard language used to create web pages. “HyperText” refers to text that links to other documents, and “Markup Language” means it uses tags to annotate content so browsers know how to display it. HTML provides the structure and content of a webpage; CSS handles the visual design, and JavaScript adds interactivity.
How does HTML relate to CSS and JavaScript?
Think of building a house. HTML is the walls, floors, and roof – the structure. CSS is the paint, wallpaper, and furniture – the appearance. JavaScript is the plumbing, electricity, and smart home system – the functionality. You need the structure first. A page built on solid HTML will still be usable even if the CSS and JavaScript fail to load.
Do I need special software to write HTML?
No. You can write HTML in any plain text editor – Notepad on Windows or TextEdit on Mac. However, a code editor designed for developers will make your life much easier with features like syntax highlighting, auto-completion, and error detection. Popular free options include Visual Studio Code, Sublime Text, and Zed.
What version of HTML should I learn?
The current version is HTML5 (more accurately, the “HTML Living Standard” maintained by WHATWG). This is what all modern browsers support and what all new tutorials should teach. If a tutorial mentions XHTML or HTML 4.01, it’s outdated – the concepts may still be valid, but the syntax and best practices have moved on.
Is HTML a programming language?
Strictly speaking, no. HTML is a markup language – it describes the structure and content of documents but doesn’t have logic, loops, or variables the way programming languages like JavaScript or Python do. That said, this distinction is mostly academic. HTML is a language you write code in, and understanding it is essential for all web development.
Conclusion
Over the course of this article, you’ve learned the philosophy behind semantic HTML, walked through the structure of HTML elements, built a real webpage from scratch, and picked up a reference guide to the most common tags.
Most importantly, you’ve learned the core principle: choose the HTML tag that most precisely represents the meaning of the content, without considering how it will be displayed.
Good semantic HTML means your pages will load fast, rank well in search engines, work across devices from Apple Watches to screen readers, and remain functional even when styles and scripts fail.
So now go out and build fantastic websites that are lightning-fast and have excellent SEO, and which work across all kinds of devices, for people of all different abilities and disabilities!